Sunday 22 June 2014

The Kilo Table

A goods weighing scale to a good side-table


I have a square-wooden top with 4 small wooden legs: Who am I?
Any guesses…

Well obviously, I am a side-table! Sitting idle and unnoticed besides your sofa or chair.  

That’s the case with most of the side (end) tables. They are the most undeserved of furniture articles. But, believe me, with some quirkiness – these bland, stout tables can create the right kind of elevation your living room requires.


So what we found was an old industrial weighing scale. The weighing scale had a squarish top; with its size perfect to that of a side-table. The scale had this ornate-brass, clock-like weight display - to measure the kilos added.  Only problem is that it needed some refurbishment to make it home ready.


Grey paint was what we used to paint the entire scale; baring the weight display (which we painted golden). The pauperly grey and the princely gold complement each other really well. Our next step was to make the flat table-top stand out. We painted the grey top with alternating black diagonal stripes. The technique used is really simple – just stick paper tape at measured intervals and paint the exposed area with the black contrasting color. Upon drying, strip out the tapes – and voila – manicured painted stripes are ready.


What we now see is this bold, eccentric end-table. Rest it besides your sofa – put your books on it; keep your coffee mug on it; check your weight on it! Home furniture with a new dimension of functionality.


Using paper tape for making alternately colored, painted stripes is a simple way to get great colorful results. Paint a light colored base coat. Make either symmetrical lines or asymmetrical criss-crossed lines. Paint the exposed area a darker color. Strip off the tapes. Your master-piece is ready.

Sunday 15 June 2014

FAN-tasy of RGB

Old standing fan - colored up in reds, greens & blues


In these days of air-conditioning, the poor-old standing fans are always at the behest of step-motherly treatments. They are all either non-working or non-usable or non-good to see anymore.


We found one of these tall fans in a tattered yet working condition in our garage. Standing 5 feet tall, with a sleek figure and the right curves: “A relinquished beauty” – that was the first thing I thought.

Our first step of the make-over was to dismantle it and clean every part of it. God knows dust of how many years lay draped on it. My idea was to give the fan a clean-white-washed look, intercepted with a burst of solid colors. So we painted all the parts a milky-white. Put on a double coat of it to give a still cleaner white look.


For the color-burst I had the 3 wings of the fan. Red, Green, Blue (RGB) – were my instant choice for each wing. These colors always give such great solidarity – its like the entire color world is incorporated into these 3.

To add a bit more quirkiness to the fan: we took red, green & blue wool and twined it around the entire length of the fan stand. Layers of the color unfurled and inter-mixed to give a beautiful effect: inexpensive ideas with such wonderful results always make it even more valuable.


Last step was to add a bit of bling on the button panel by gluing silver sequins on it.

So our tall, sleek beauty was ready to be adored by the world. With this drastic fan make-over all heads surely will turn to see which way the fan turns!


 Contrast whites with deep solid colors, to give better color impact & contrast. The difference in luminescence makes an object more distinguishable. 

Saturday 7 June 2014

Treasure Shoeland

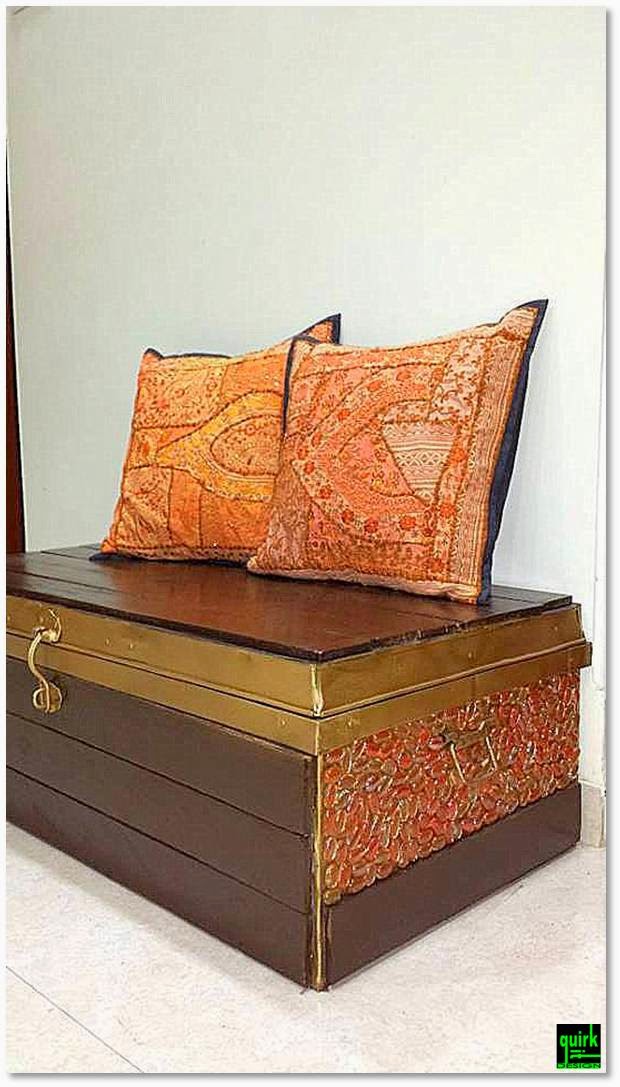
A jeweled ‘chest’ coupled as a shoe box and tripled as an elegant settee


I found this old aluminum chest lying in the corner of our office store room - completely haggard and dusted. Just looking at it, I knew by adding some wood and some gold I can convert this old world metal box into a still older world but grander treasure chest.

Looks aside, this chest definitely needed to have a bigger purpose. So I pondered and wondered. Then finally I knew that a shoe-box would be ideal which could double up as a sitting element.


With lots of excitement, I started my up-cycling project. For internal division, used elastic ribbons to make 15 shoe compartments. Also painted the interiors of the chest completely black, to keep the dirtying under control.


Got wooden planks sized to fit the chest, laid over to give a rich covering. Polished the wood dark brown and gold- rimmed the visible aluminum edges. For some more texture & richness mosaiced the sides with orange streaked- transparent pebbles (which look no less than jewels). The side handles and locking device, were fixed, all in gold. Voila, the exquisite exterior was done - it definitely exuding treasured richness.


To add the final touches, we got these hand-embroidered cushions from Udaipur - which adds to the sitting comfort and also adds on to its beauty. Loved the final outcome of it - from its purposeful interiors to its rich-jeweled exteriors. A perfect piece for a grand entryway to your royal home.